The 5R110W TorqShift transmission's shift sequence is controlled by a series of 7 electric shift solenoids. Of these 7 solenoids, there are two types; directly proportional and inversely proportional. Directly proportional solenoids are "normally closed", thus the hydraulic circuit will reach maximum pressure at 1 amp and minimum pressure at 0 amps. The pressure in the circuit is directly proportional to the amperage (between 0 and 1 amp) delivered to the solenoid. Inversely proportional solenoids are "normally open", thus the hydraulic circuit will reach maximum pressure at 0 amps and minimum pressure at 1 amp. The pressure in the circuit is inversely proportional to the amperage (between 0 and 1 amp) delivered to the solenoid.
Ford 5R110W TorqShift Solenoid Replacement Parts List
General Replacement Parts
Part Description |
Part Number(s) |
Remarks/Notes |
|
Internal transmission filter |
6.0L Power Stroke |
[1] |
|
6.4L Power Stroke |
|||
External transmission filter |
[2] |
||
Transmission pan gasket |
[3] |
||
Transmission solenoid body gasket |
--- |
||
Through-transmission connector o-ring |
--- |
||
Automatic transmission fluid (ATF) |
[4] |
||
Transmission pan bolts |
N/A, see footnote |
[5] |
|
[1] Internal transmission fluid filter.
[2] External/auxiliary filter located near ATF cooler on passenger side frame rail.
[3] Gasket is reusable; replace if suspect damage, cracking, etc.
[4] Use only MERCON SP only; do not substitute with "universal" ATF or any alternative MERCON fluid.
[5] M8 x 1.25 x 14mm long flange bolt, class 9.8, replace as required.
Transmission Solenoid Part Numbers
Solenoid |
Ford P/N |
Type |
ID |
PC-A (line pressure solenoid) |
Inversely proportional |
Centered locating tab |
|
SSPC-A (shift solenoid A, coast clutch) |
Inversely proportional |
Low locating tab |
|
SSPC-B (shift solenoid B, overdrive clutch) |
3C3Z-7J136-AB |
Directly proportional |
High locating tab |
SSPC-C (shift solenoid C, intermediate clutch) |
3C3Z-7J136-AB |
Directly proportional |
High locating tab |
SSPC-D (shift solenoid D, direct clutch) |
Inversely proportional |
Low locating tab |
|
SSPC-E (shift solenoid E, low/reverse clutch) |
3C3Z-7J136-AB |
Directly proportional |
High locating tab |
TCC (torque converter clutch solenoid) |
3C3Z-7J136-AB |
Directly proportional |
High locating tab |

Each solenoid has a mounting tab at the base of the snout (extruded valve) that corresponds to a groove in the solenoid body, ensuring that a directly proportional solenoid cannot be installed in place of an inversely proportional solenoid and visa versa. The line pressure solenoid (PC-A) has a unique centered locating tab. The remaining inversely proportional solenoids feature a "low" locating tab, while all directly proportional solenoids possess a "high" locating tab per the above figure.
Solenoids SSPC-A and SSPC-D are identical and interchangeable. Solenoids SSPC-B, SSPC-C, SSPC-E, and TCC are identical and interchangeable. To replace all 7 solenoids, (1) PC-A solenoid (4C3Z-7G383-AA), (2) inversely proportional solenoids (3C3Z-7J136-AA), and (4) directly proportional solenoids (3C3Z-7J136-AB) are required. Replacement of the line pressure solenoid (PC-A) requires the solenoid body to be removed from the transmission. All other shift solenoids can be replaced without removing the solenoid body.
5R110W Transmission Solenoid Diagnostics
A faulty shift solenoid can be responsible for a number of symptoms, including harsh or irregular shifts and transmission slipping. A blinking Tow/Haul indicator reveals that a trouble code has been stored and will help identify the specific system failure if one has been recorded. Pulling transmission codes on the 5R110W requires special equipment, such as AutoEnginuity; most over-the-counter, inexpensive code readers will not pull codes specific to the transmission system. If you experience a blinking Tow/Haul indicator light but find no codes, your code reader lacks support for the system.
Individual solenoids can be tested using a digital multimeter. It is easiest to test the solenoids with the transmission pan removed - individual pins of the transmission connector can be probed, however space is extremely limited. With the pan removed, pull the connector off of the solenoid you wish to test and check the resistance across the two pins. If resistance is out of spec from the chart below, the solenoid is faulty. Do not test the resistance with a warm transmission - temperature should be roughly 70° F.
Transmission Solenoid Resistance Values
PC-A (early) |
PC-A (late) |
SSPC-A |
SSPC-B |
SSPC-C |
SSPC-D |
SSPC-E |
TCC |
4.1 - 4.7 Ω |
5.1 - 5.8 Ω |
4.1 - 4.7 Ω |
4.1 - 4.7 Ω |
4.1 - 4.7 Ω |
4.1 - 4.7 Ω |
4.1 - 4.7 Ω |
4.1 - 4.7 Ω |
TorqShift Transmission Solenoid Replacement Procedures
Click any thumbnail image to view fullsize
• Disconnect both negative battery cables.
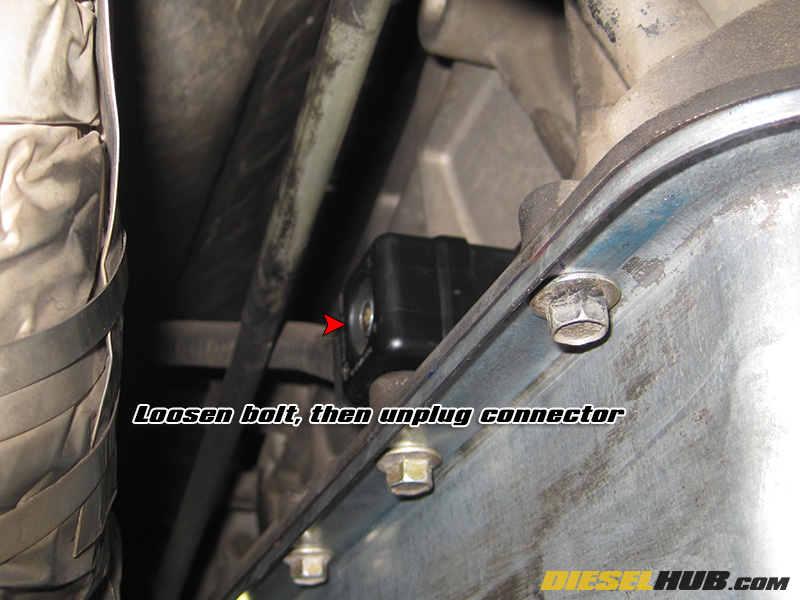
• Locate the connector on the passenger side of the transmission.
• Completely loosen the 10mm bolt holding the two sections of the connector together, then pull the connector outwards to unplug (note - the 10mm bolt cannot be removed, but it must be loosened completely in order to unplug the connector).
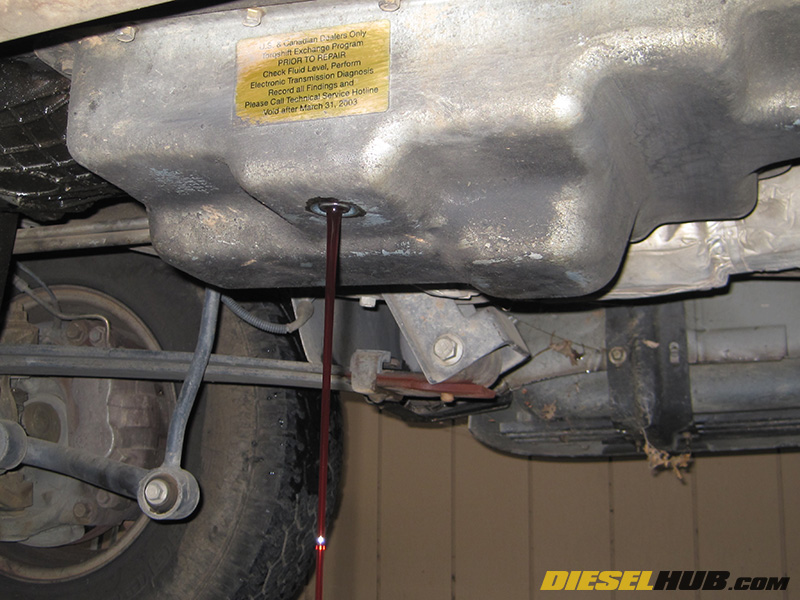
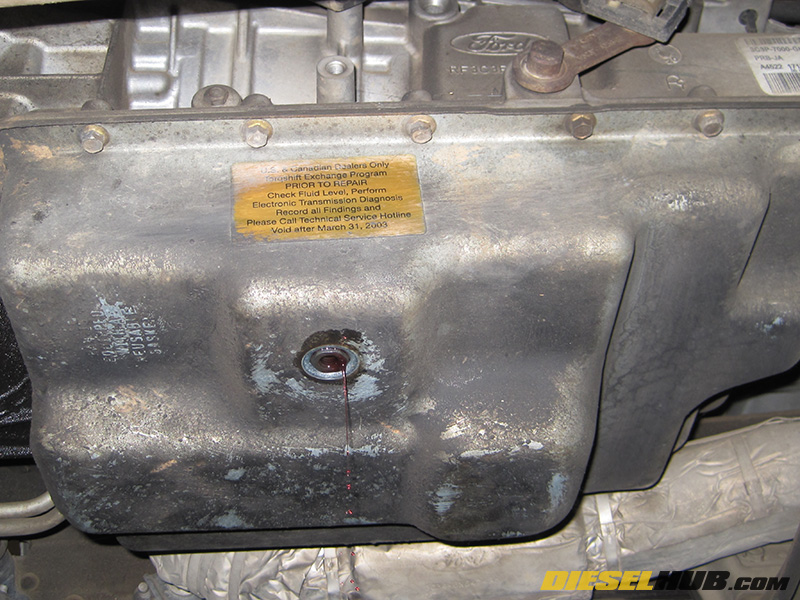
• Place a suitable container beneath the transmission and then remove the drain plug with a 13mm socket/wrench. Allow the fluid to drain completely, then replace the drain plug.
• With a 10mm socket, remove 18 of the 20 transmission pan bolts. Loosen, but do not remove one bolt on the driver side and one bolt on the passenger side near the middle of the pan. These two bolts will hold the transmission pan in place until you're ready to drop it. You will need a variety of extensions and swivel joints to reach the rear transmission pan bolts on 4x4 models.
• While supporting the transmission pan, remove the two remaining bolts and then the transmission pan and pan gasket - clean and set aside in a safe place.
• Remove the transmission filter by rocking side-to-side while pulling downwards. Verify that the gasket was removed with the filter - you may have to fish it out with a pick.
5R110W TorqShift Solenoid/Valve Body Removal
Note - you may skip to step 9 of these procedures unless you are replacing the line pressure solenoid (PC-A) - this is the only solenoid that requires removal of the solenoid body. The remaining solenoids can be replaced with the solenoid body installed.
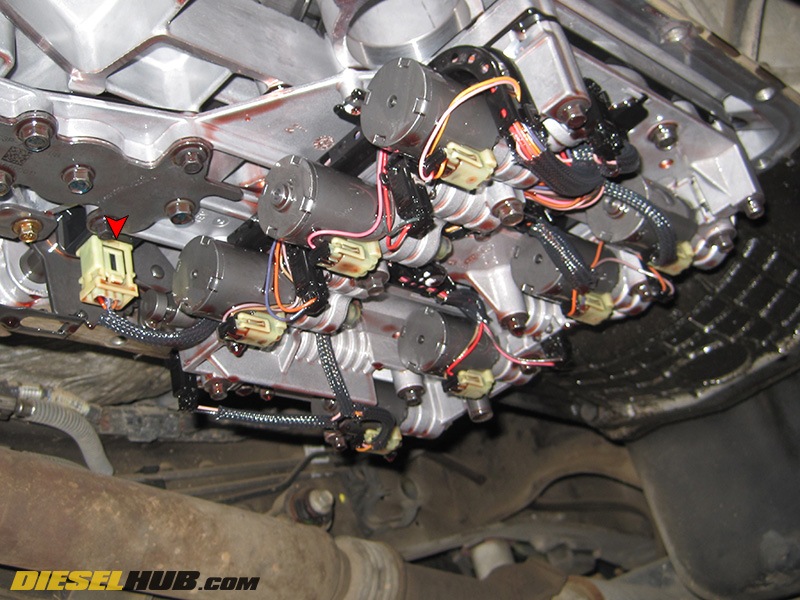
• Locate and unplug the transmission range sensor electrical connector towards the driver side of the transmission, just behind the rearmost bank of solenoids (see red arrow in fullsize image).
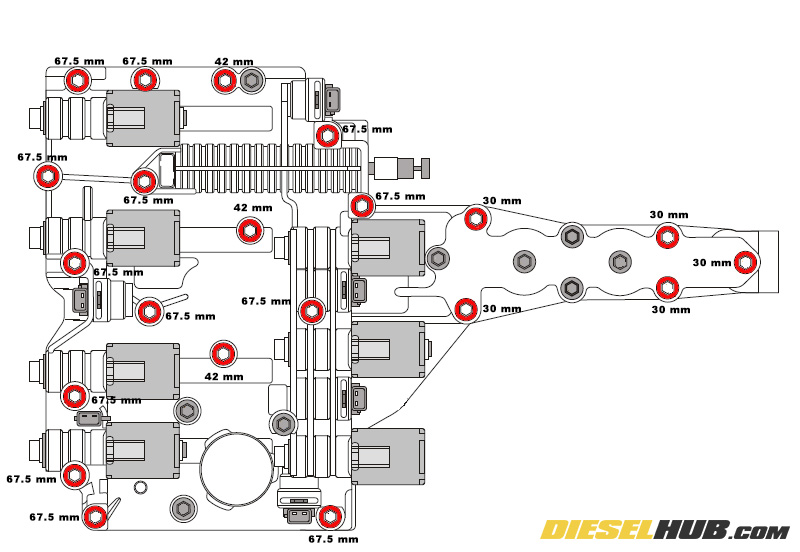
• Referring to the figure at left, remove all 21 bolts shaded in red with an 8 mm socket. The length of the bolts will vary, but do not worry about separating them.
View printable version of fastener map
• With the bolts removed, gently pull the solenoid body straight downwards with a slight side-to-side rocking motion. It should come off easily, do not force - if it is stuck, double check the correct bolts were removed.
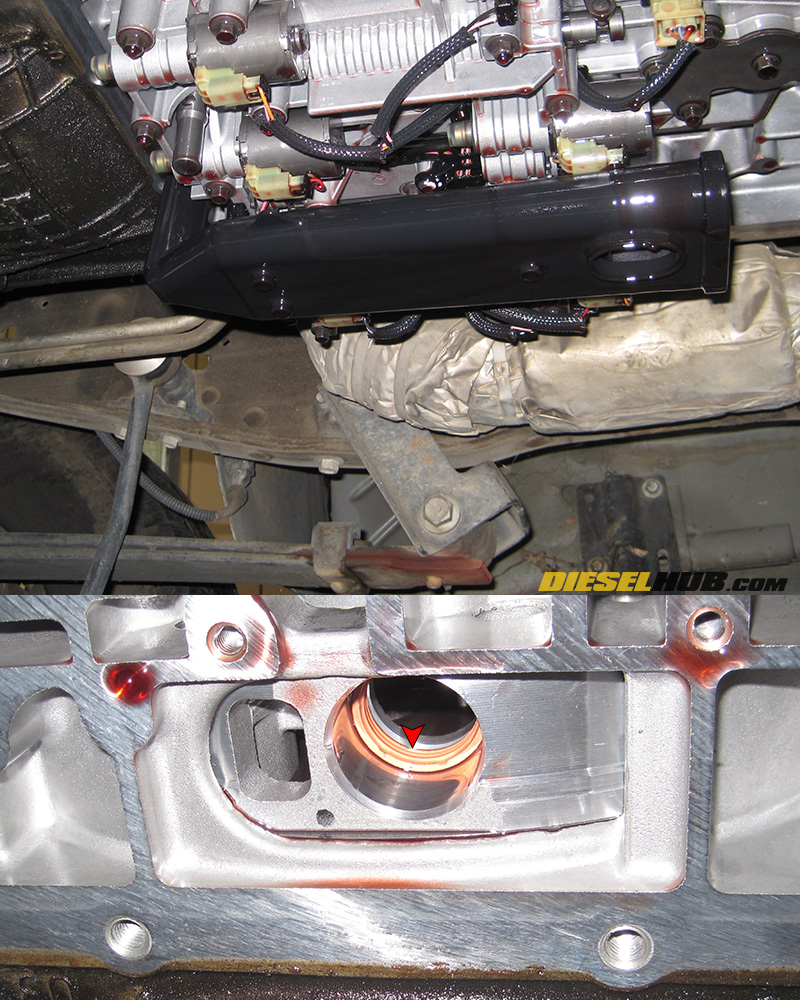
• ![]() Upon removing the solenoid body, a small metal washer should fall with it; this is the forward clutch orifice. Don't be alarmed, we'll reinstall it later.
Upon removing the solenoid body, a small metal washer should fall with it; this is the forward clutch orifice. Don't be alarmed, we'll reinstall it later.
• With the solenoid body removed and placed on a clean workspace, remove the o-ring from the through-transmission connector. Do not re-use this o-ring.
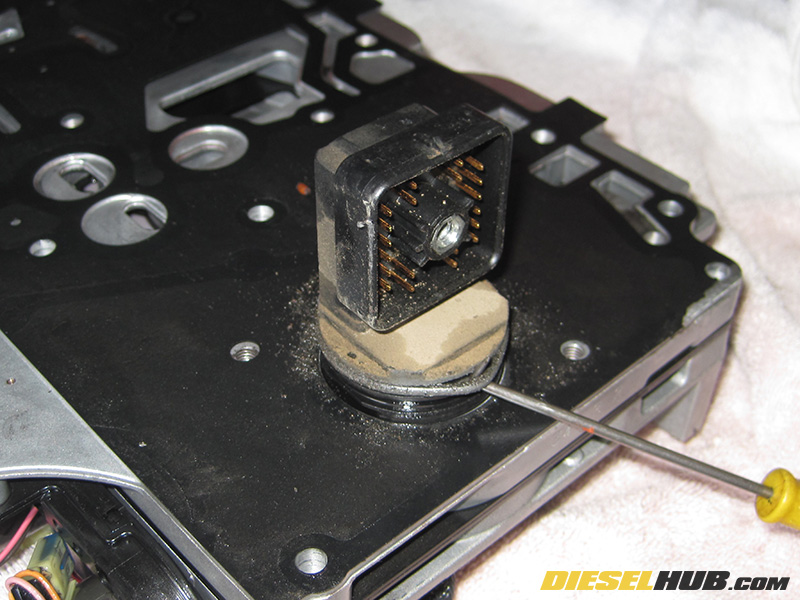
• In order to access the line pressure control solenoid (PC-A), the electrical connector through the solenoid body must be removed. Carefully pry up on the small locking tab, then rotate the connector counterclockwise until it slides up and out. You do not have to remove the entire wiring harness.
5R110W TorqShift Shift Solenoid Replacement

• Locate the solenoid(s) that need to be replaced. To view location of individual solenoids, see diagram at left.
• Note - it may be helpful to remove the wiring harness hold down bolt (T25 torx) to improve access to some solenoids. Simply remove the hold down bolt and push the harness out of your way as necessary. Reinstall bolt after completion.
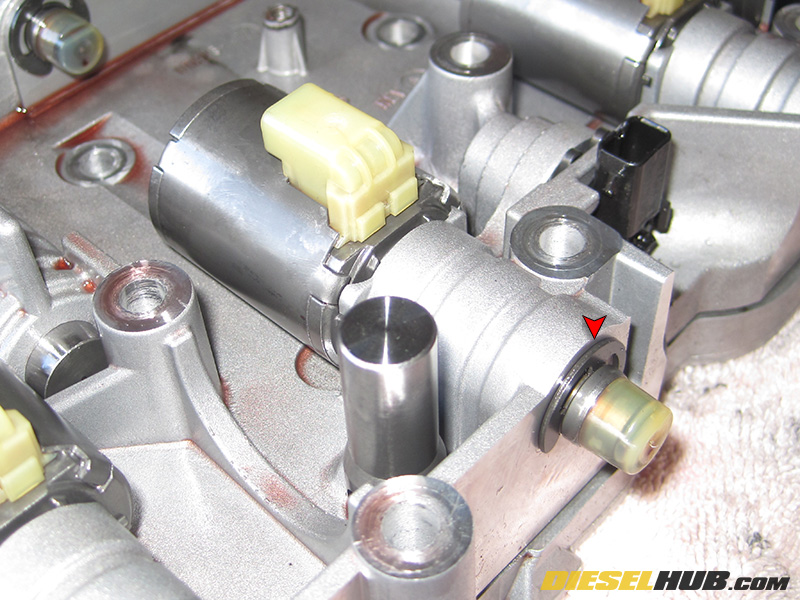
• To replace a solenoid, remove the electrical connector, then the E clip holding it in place. Next, simply slide the solenoid out and install the new one in reverse order. If the solenoid is tight, tap on the snout of the solenoid with one hand while applying pressure at the body of the solenoid with the other. Do not forget to reinstall the electrical connector and E clip.
• You may notice a series of pressure sensors in the solenoid body - these are only used as plugs, do not be alarmed if they are not wired into the harness. Early TorqShift transmission wiring harnesses will be wired for the pressure sensors while later transmissions will not.
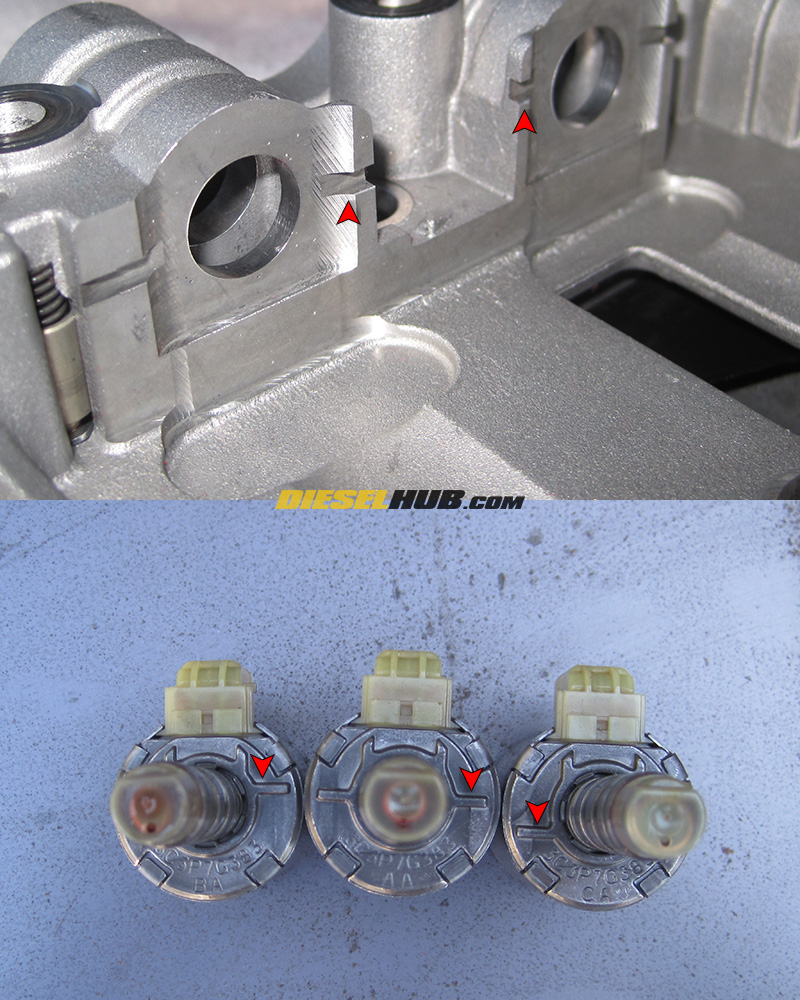
• Notice the indentations in the solenoid/valve body that correspond to the locating tabs on the individual solenoids - this is so you cannot install a directly proportional solenoid in the slot of an inversely proportional solenoid and visa versa. Solenoids should install with ease, do not attempt to force them into place.
• If the through solenoid body connector was removed in order to replace the PC-A solenoid, reinstall the connector using a new, lightly greased o-ring.
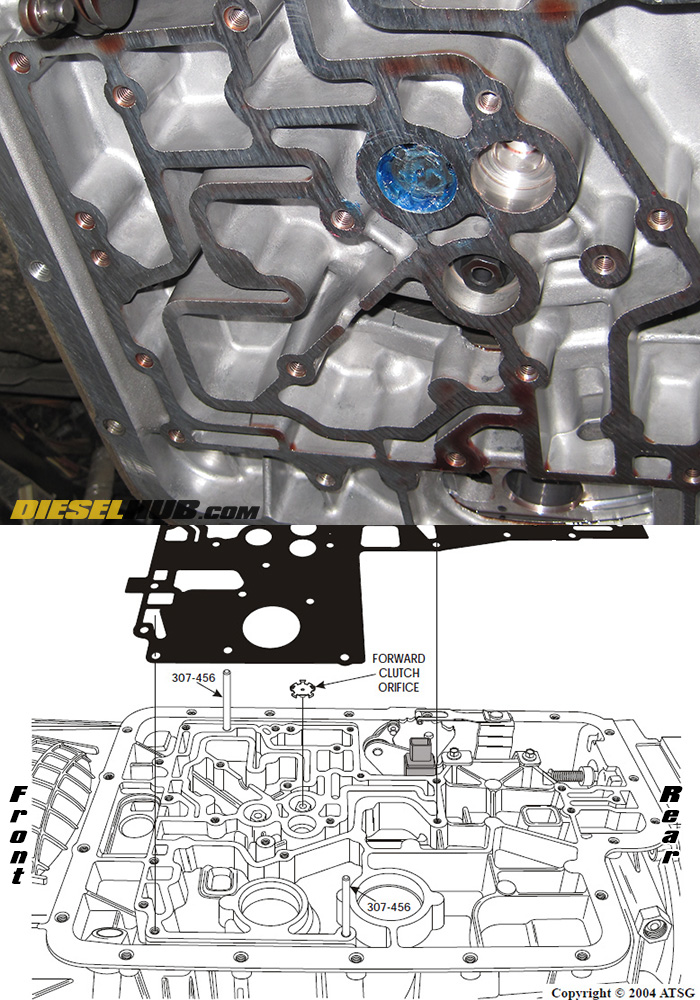
• ![]() Reinstall the forward clutch orifice. To do so, you will need to cover it in transmission assembly lube and then place it in its cavity per the image and diagram at left (click thumbnail for fullsize view). Do not use grease, petroleum jelly, or any other substitute- this needs to be done with transmission assembly lube, which is compatible with ATF (and inexpensive).
Reinstall the forward clutch orifice. To do so, you will need to cover it in transmission assembly lube and then place it in its cavity per the image and diagram at left (click thumbnail for fullsize view). Do not use grease, petroleum jelly, or any other substitute- this needs to be done with transmission assembly lube, which is compatible with ATF (and inexpensive).
• Reinstall the valve body using a new valve body gasket. Hand tighten all bolts - use the map from procedure 6 above in order to position the various bolt lengths in their correct location.
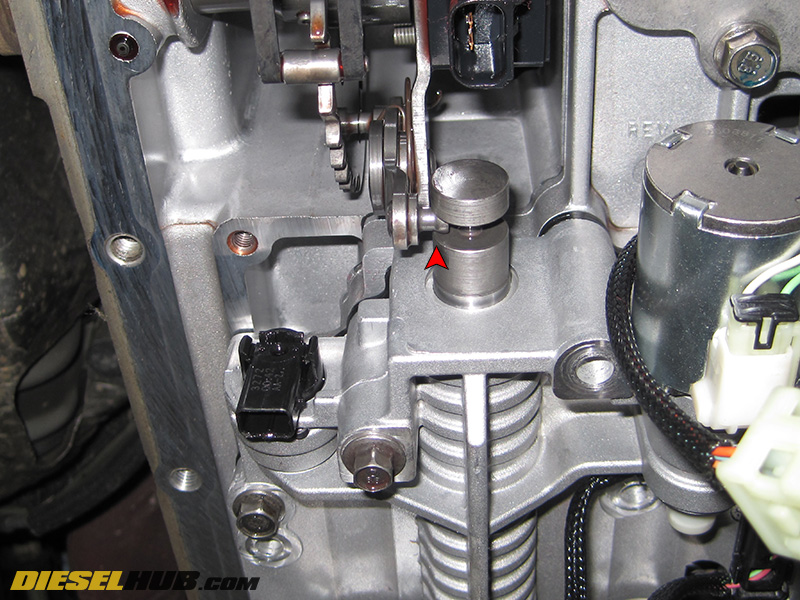
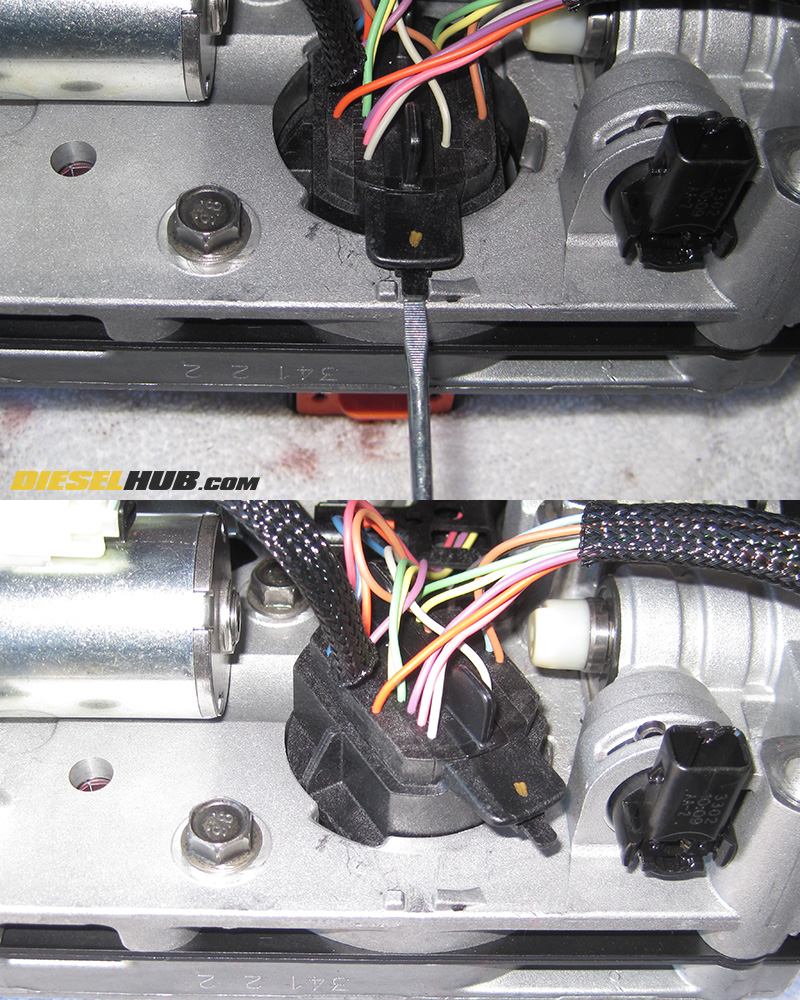
• When reinstalling the solenoid/valve body (if applicable), ensure that the shift rail on the driver side properly makes contact with the tang for the shifter apparatus (see fullsize image for clarification). Torque all 8mm solenoid body bolts to 89 in-lbs, starting with the center bolts and working outwards in a circular fashion.
• Reconnect the transmission range sensor connector on the driver side that was previously removed (if applicable).
• Install new transmission filter. Lightly coat o-ring with transmission assembly lube or ATF to ease installation.
• Double check that all solenoid E clips are properly installed and all electrical connectors secured before continuing.
• Reinstall the transmission pan and pan gasket. Torque all bolts to 11 ft-lbs.
• Reconnect transmission connector on passenger side and tighten center bolt - do not over torque, the connector hold down does not need to be particularly tight.
• Refill transmission with ATF until the fluid level reaches the cold fill indicator on the transmission dipstick. Reconnect batteries, then start engine and check for leaks. Test drive truck, allowing transmission to reach operating temperature. Re-check transmission fluid level and adjust as necessary.